TeamTalk has many options which can be configured in the application's Preferences. To bring up Preferences simply hit F4.
The Preferences dialog has the following tabs:
The items in each of the tabs are explained in the following sections.
General
The General-tab is for basic settings like nickname and how to transmit audio.
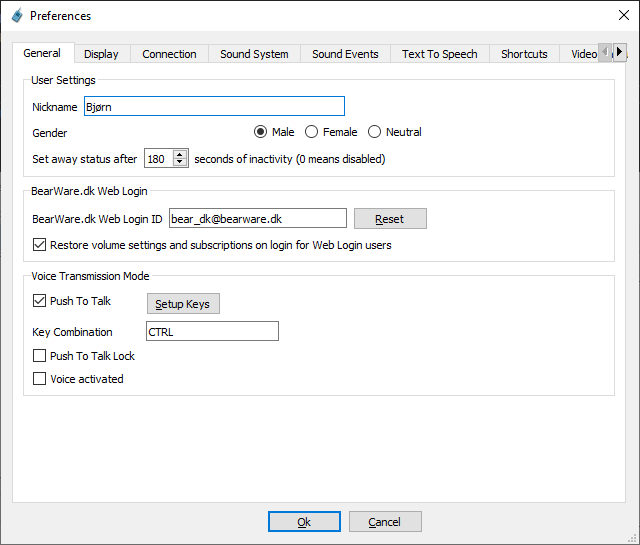
General-tab
- Nickname
- The name other users will see as you when logging on to a server.
- Gender
- This option selects whether other users should see you as a Male or Female.
- Set away status after...
- If non-zero this option will automatically set you as away after the specified number of seconds.
- BearWare.dk Web Login ID
- Restore volume settings and subscriptions on login for Web Login users
- When a remote user is using BearWare.dk web login it's possible to restore the volume levels and subscriptions of that user.
- A remote user is identified by its BearWare.dk Web Login ID and client application. The client application is included in the identification so the same volume levels are not restored on the remote user's mobile device and desktop PC.
- Push To Talk
- A so-called Push To Talk key combination can be set up so one has to hold down a set of keys in order to transmit audio data. This is especially useful to avoid echos from speakers.
- Push To Talk Lock
- The default behavior is to only transmit voice when the Push To Talk key combination is held down. With this option the Push To Talk key combination has to be pressed both for voice transmission starting and voice transmission stop.
- Voice activated
- Instead of using a Push To Talk key combination one can simply have TeamTalk start transmitting whenever you're talking by enabling this option.
Display
The Display-tab contains settings about the application's appearance.
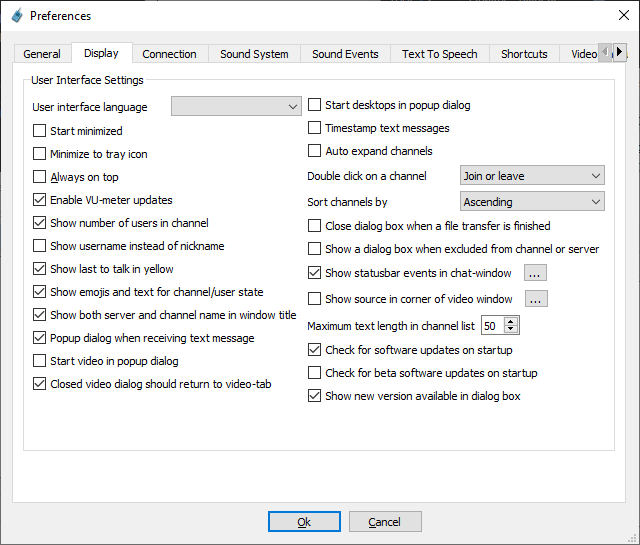
Display-tab
The items in the Display-tab are explained here:
- User interface language
- The language to use in the application.
- Start minimized
- If enabled TeamTalk will minimized itself once it starts.
- Minimize to tray icon
- If enabled TeamTalk will go in Windows system tray when minimized. The system tray is in the bottom right corner of Windows.
- Always on top
- If enabled TeamTalk will always be in front of other running programs.
- Enable VU-meter updates
- The progress bar for voice activity can be disabled by using option. This is useful for screen-readers.
- Show number of users in channel
- If enabled a parentesis will be shown on each channel with the number of users in the channel.
- Show username instead of nickname
- See usernames (login names) instead of nicknames in channels tree view.
- Show last to talk in yellow
- The last person to talk in a channel should be displayed with yellow background.
- Show emojis and text for channel/user state
- Emojis are shown in channels tree view for the channel or user's current state. E.g. woman icon for female and ghost for hidden channels.
- Show both server and channel name in window title
- Main window's title bar should show both server's name and current channel.
- Popup dialog when receiving text message
- If enabled a dialog window will pop up if someone writes you a text message.
- Start video in popup dialog
- When a user starts transmitting video (from webcam) to the video session should be displayed in a separate dialog instead of in the Video-tab.
- Closed video dialog should return to video-tab
- By default closing a video popup dialog will return it to the Video-tab. If the video should simply no longer be displayed after closing a video dialog then uncheck this option.
- Start desktops in popup dialog
- When a user shares a desktop window it should be displayed in a separate dialog instead of the Desktop-tab.
- Timestamp text messages
- If enabled each text message will have a timestamp telling when it was received.
- Auto expand channels
- By default channels, except the currently joined channel, are collapsed. This option can be used to expand all channels automatically.
- Double click on a channel
- Change behavior of double clicking a channel in the channel tree view.
- Sort channels by
- Choose how channels should be sorted in channel tree view.
- Close dialog box when a file transfer is finished
- Normally file transfer dialog stay open after transmission is finished.
- Show a dialog box when excluded from channel or server
- When kicked and/or banned from a server a dialog box can be displayed to inform about this incident.
- Show statusbar events in chat-window
- If enabled all messages which are shown in the application's statusbar will also be put in the channel chat-tab window".
- <strong>Show source in corner of video window</strong>
- If enabled the name of the person who is sending video will be
shown in corner of the video window.
- <strong>Maximum text length in channel list</strong>
- The names of users and channels can sometimes be very long. Use
this option to limit the length names.
- <strong>Check for program updates at start up</strong>
- When TeamTalk starts it should check to see if there's a new
version available. If a new version is available a text message
will be shown in the @ref chattab "Chat-tab".
- <strong>Check for beta software updates on startup</strong>
- Enable this option to be informed about new test versions of the
upcoming TeamTalk release.
- <strong>Show new version available in dialog box</strong>
- New software versions are normally shown in status messages but a
dialog box can show the information instead.
@section connectiontab Connection
The <em>Connection</em>-tab is used for configuring how the client should
connect to a server.
@image html pref_connection.png "Connection-tab"
The items in the Connection-tab are explained here:
- Connect to latest host on startup
- If enabled the server which TeamTalk was connected to last it was running will be used again when TeamTalk starts.
- Reconnect on connection dropped
- If the connection to a server is lost TeamTalk should automatically reconnect to the server.
- Join root channel upon connection
- If enabled TeamTalk will automatically join the root channel on the server after authentication.
- Query server's maximum payload upon connection
- Some networks restrict the size of UDP-packets which can make cause audio, video and desktop sessions not to work properly. Enabling this option will make TeamTalk query the maximum size the server allows for UDP-packets. TeamTalk accomplish this by sending several "bogus" UDP-packets with different sizes to the server in order to figure out how big UDP-packets are allowed.
- Add application to Windows Firewall exception list
- The Windows Firewall by default does not allow applications to receive data from unknown clients. This can cause TeamTalk not being able to communicate properly with server and other clients when using P2P mode. It is therefore recommended to add TeamTalk to the Windows Firewall exception list.
- Default Subscriptions upon Connection
- User Messages
- By disabling this option all text message sent to you will be ignored unless you explicitly subscribe to User Messages from a user in the Subscriptions-menu.
- Channel Messages
- By disabling this option all channel text message will be ignored unless you explicitly subscribe to Channel Messages from a user in the Subscriptions-menu.
- Broadcast Messages
- By disabling this option all broadcast text message will be ignored unless you explicitly subscribe to Broadcast Messages from a user in the Subscriptions-menu.
- Media Files
- By disabling this option you will not hear or see media files being streamed to the channel you're in unless you explicitly subscribe to Media Files from a user in the Subscriptions-menu.
- Voice
- By disabling this option all voice will be ignored unless you explicitly subscribe to Voice from a user in the Subscriptions-menu.
- Video Capture
- By disabling this option all video will be ignored unless you explicitly subscribe to Video from a user in the Subscriptions-menu.
- Desktop
- By disabling this option all shared desktops will be ignored unless you explicitly subscribe to Desktop from a user in the Subscriptions-menu.
- Desktop Access
- Setting up default subscriptions for desktop access can make others users automatically get control of mouse and keyboard. Desktop Access is also available in the Subscriptions-menu.
- TCP port
- The socket used for TCP should bind to the specified port. Do not change unless you know what you're doing.
- UDP port
- The socket used for UDP should bind to the specified port. Do not change unless you know what you're doing.
Sound System
The Sound System-tab is for configuring your audio recording and playback devices.
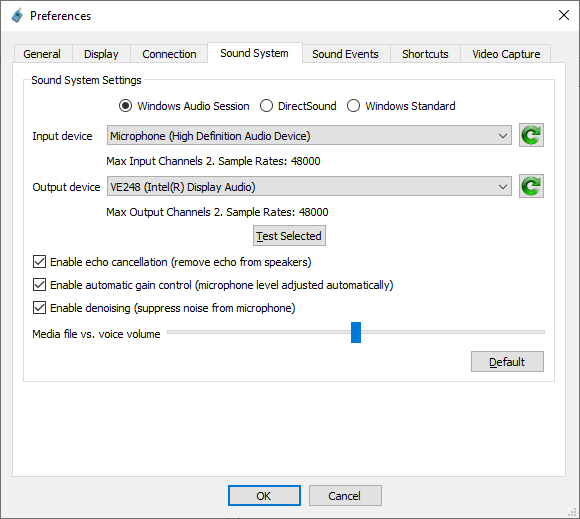
Sound System-tab
The items in the Sound System-tab are explained here:
- Windows Audio Session
- The preferred sound system on Windows.
- DirectSound
- Provides best compatibility with sound devices.
- Windows Standard
- Windows default sound system. This typically is slower than DirectSound and Windows Audio Session.
- ALSA
- This sound system is only available on Linux.
- Core Audio
- This sound system is only available on Mac OS X.
- Input Device
- The sound device to use for recording audio. It is advised to use one which supports stereo, i.e. label below should say Max Input Channels 2.
- Output Device
- The sound device to use for audio playback. It is advised to use one which supports stereo, i.e. label below should say Max Output Channels 2.
- Test Selected
- Use this to test the selected sound devices.
- Enable echo cancellation (remove echo from speakers)
- If you're using speakers instead of headphones when other users may be hearing themselves due to echo from speakers. Enabling this option will remove the echo from speakers.
- Echo cancellation affects audio quality and is therefore not enabled by default.
- For optimal configuration of echo cancellation please refer to section Optimal Echo Cancellation
- Enable automatic gain control (microphone level adjusted automatically)
- The volume level of microphones vary a lot therefore it's recommended enabling automatic gain control (AGC) to ensure all users in a channel speak at the same volume level. AGC is used in combination with Audio Configuration when creating channels. The volume level specified in the Audio Configuration will be used as reference volume for AGC.
- Enable denoising
- If you have a poor quality microphone it is advised to enable denoising.
- Default
- This button resets all sound system items to their default values.
Optimal Echo Cancellation
Echo cancellation performs best if the selected sound input device and sound output device use the sample rate (typically 48000 Hz).
On Windows 10 the default sample rate of sound devices can be configured in Settings (formerly Control Panel). Sound settings are found in System category. Here press Sound Control Panel in Related Settings and the following dialog will open:
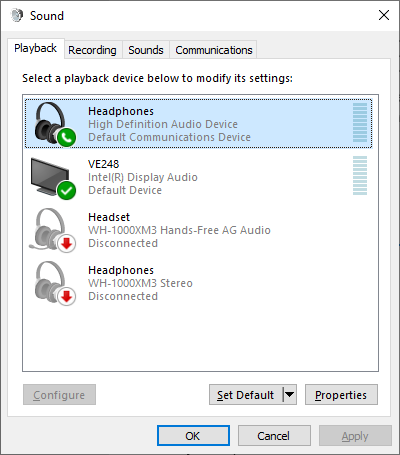
Sound Control Panel
Click Properties on the selected sound output device, in Playback-tab, and select a sample rate that is also supported by the sound input device. The sample rates is located under Advanced-tab (see screenshot below). The sound input device is located in Recording-tab and also configurable using Properties button. The recommended setting is 2 channel (stereo), 16-bit at 48000 Hz.
Below is shown "Headphones" playback device using the recommended settings:
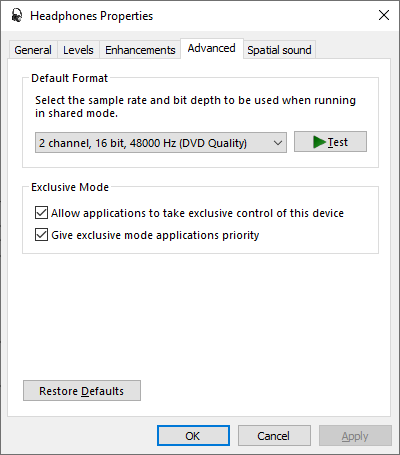
Sound Control Panel
If it is not possible to set up the same sample rate on sound input and output device then TeamTalk will try to use Windows' built-in echo canceller which is suboptimal. The Windows echo canceller converts recorded audio to mono at 22050 Hz.
For best echo cancellation it is also advised to enable the Audio Configuration option when creating channels.
Sound Events
The Sound Events-tab is for playing sound when certain events take place.
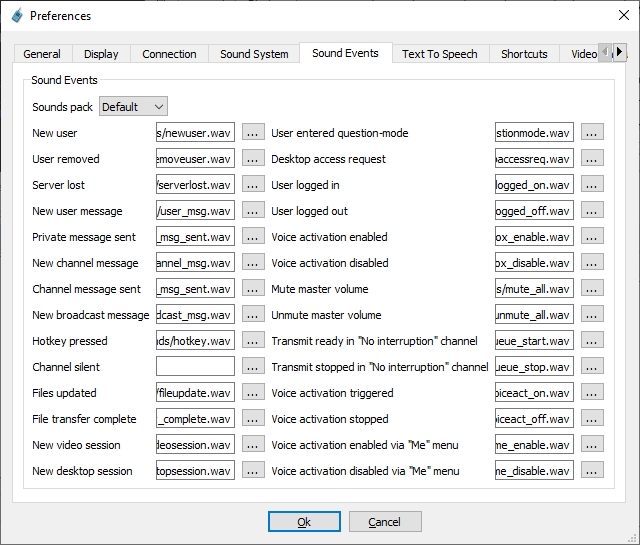
Sound Events-tab
The items in the Sound Events-tab are explained here:
- Sounds pack
- TeamTalk comes with a set of default sounds but these default sound events can be changed by choosing another "Sound Pack". New sound packs can be added to TeamTalk by copying files to the Sounds folder in TeamTalk's installation directory.
- Sound event volume level
- The volume level of enabled sound events. Note that if "Playback
mode" is played on "TeamTalk Sound Device" then volume level is also controlled by Master Volume slider in main window.
- Playback mode
- Sound events can be played back in the following ways:
- Default
- Playback sound event using operating system default sound device.
- One by One (TeamTalk Sound Device)
- Overlapped (TeamTalk Sound Device)
- New user
- Play this sound when a new user joins your channel.
- User removed
- Play this sound when a user leaves your channel.
- Server lost
- Play this sound if TeamTalk drops its connection to the server.
- New user message
- Play this sound when a user to user text message is received.
- Private message sent
- Play this sound when a new private text message is sent.
- New channel message
- Play this sound when a channel text message is received.
- Channel message sent
- Play this sound when a channel text message is sent.
- Hotkey pressed
- Play this sound when the Push to Talk key combination is pressed.
- Channel silent
- Play this sound when the last user has stopped talking and there's no one left who is talking in the channel.
- Files updated
- Play this sound when a file is either added or deleted.
- File transfer complete
- Play this sound when a file transfer is completed.
- New video session
- Play this sound when a new video stream can be seen in the Video-tab.
- New desktop session
- Play this sound when a new shared desktop can be seen in the Desktops-tab.
- User entered question-mode
- Play this sound when a user changes status to question mode.
- Desktop access request
- Play this sound when a user requests access to your shared desktop session.
- User logged in
- Play this sound when a user logs in.
- User logged out
- Play this sound when a user logs out.
- Voice activation enabled
- Play this sound when voice activation is enabled from settings at startup.
- Voice activation disabled
- Play this sound when voice activation is disabled from settings at startup.
- Mute master volume
- Play this sound when master volume is muted.
- Unmute master volume
- Play this sound when master volume is unmuted.
- Transmit ready in "No interruption" channel
- Play this sound when it's your turn to speak in a channel configured with channel option "No interruption", i.e. only one can transmit.
- Transmit stopped in "No interruption" channel
- Play this sound when it's no longer your turn to speak in a channel configured with channel option "No interruption*,
i.e. only one can transmit.
- <strong>Voice activation triggered</strong>
- Play this sound when microphone level has activated voice
transmission.
- <strong>Voice activation stopped</strong>
- Play this sound when voice transmission stops due to microphone
level.
- <strong>Voice activation enabled via "Me" menu</strong>
- Play this sound when voice activation is enabled from menu item.
- <strong>Voice activation disabled via "Me" menu</strong>
- Play this sound when voice activation is disabled from menu item.
@section texttospeechtab Text to Speech
The Text to Speech tab is used to toggle text to speech events.
@image html pref_tts.png "Text to Speech-tab"
Text to speech events can be used as an alternative to status messages.
Shortcuts
The Shortcuts tab is for keyboard shortcuts (hotkey) for common tasks.
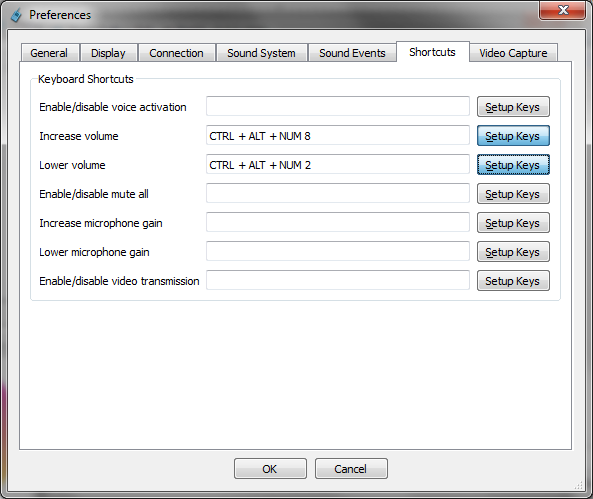
Shortcuts-tab
The items in the Shortcuts-tab are explained here:
- Enable/disable voice activation
- Global hotkey to turn on/off voice activation.
- Increase volume
- Global hotkey to increase the master volume.
- Lower volume
- Global hotkey to lower the master volume.
- Enable/disable mute all
- Global hotkey to mute all users.
- Increase microphone gain
- Global hotkey to increase the microphone volume.
- Lower microphone gain
- Global hotkey to low the microphone volume.
- Enable/disable video transmission
- Global hotkey to turn on/off video transmission.
Video Capture
The Video Capture-tab is for configuring web camera for video recording.
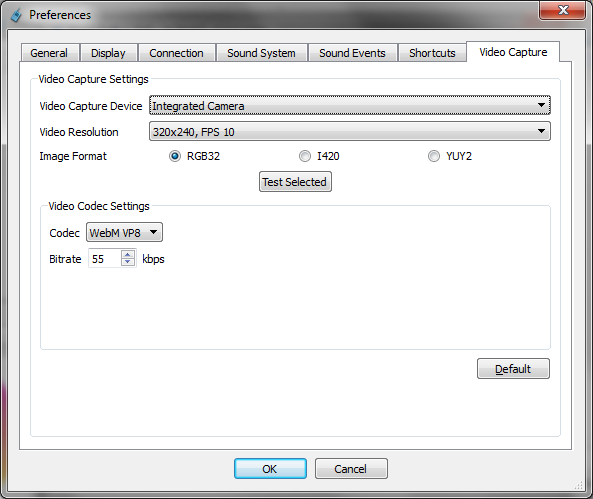
Video Capture-tab
The items in the Video Capture-tab are explained here:
- Video Capture Device
- The web camera to use for capturing video.
- Video Resolution
- The video resolution to use and the frame rate (FPS).
- Image Format
- The image format to use. Use RGB32 to get the best picture quality and I420 for the highest frame rate.
- Test Selected
- Test the selected video capture settings. Note the video codec settings are not used when testing this.
- Codec
- The video codec to use for compressing the video data.
- Bitrate
- The bitrate the video encoder should target. The higher the value, the higher the bandwidth usage. Read the Quick Start section on how to configure the settings which are best for your Internet connection.
- Default
- Make TeamTalk choose the default settings.


