This section gives an introduction to the features available in the TeamTalk application. To be able to use the features explained in this tutorial you need to be connected to a server and have joined a channel. If you don't want to set up your own server you can press F2 to get a list of official TeamTalk servers.
Here is an overview of the list of features which are being described in this section:
Main Window
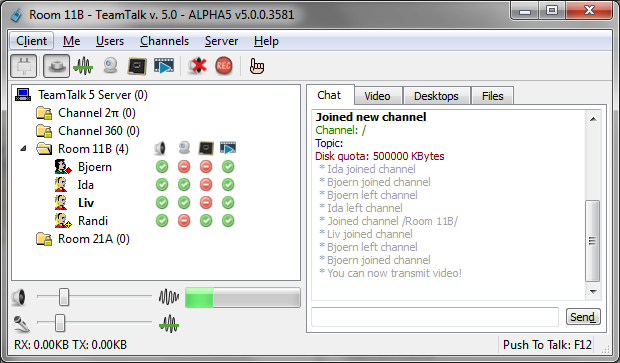
The TeamTalk application consists of a menubar, a toolbar, a channels view in the left side with volume controls below and a tab control with four tabs to the right. Between the channels view and the tab control is a so-called splitter which can be used to change the size of the channels view and tab control.
The following screenshot is included to help explain the TeamTalk application's user interface.

Main window
Menu Bar
In the top of the application are six menu-items: Client, Me, Users, Channels, Server and Help. The Client-menu is for configuring the TeamTalk application and connecting to servers. The Me-menu gives access to options which should be set for the local user (meaning you), like e.g. changing your nickname or status. The Users-menu is used for interacting with other users, like e.g. changing their sound volume or sending them text-messages. The Channels-menu is used for controlling channels, like e.g. creating new channels or updating existing ones. The Server-menu is for changing or viewing the server's options and finally the Help-menu is for assistance.
Toolbar
The toolbar simply provides easy access to common tasks which are also available though the menu items.
- Connect button
- The first button in the toolbar, which looks like a plug, is for connecting to a server. Once pressed it opens the Connect to a Server Dialog.
- Enable Push to Talk button
- The second button in the toolbar, which looks like a button, is for enabling a push to talk button. Push to talk is a key combination which must be held down whenever you are talking. If not push-to-talk key is defined it will open the Push to Talk.
- Enable Voice Activation button
- The third button, which looks like waves, are for enabling voice activation. Enabling this will make a slider show up in volume controls below the channels view. Move this slider left and right either changes the voice activation level.
- Enable Video Transmission button
- The fourth button, which looks like a webcamera, is for enabling video transmission. Before this can be used a camera must be set up in the Video Capture-tab in Preferences. Once the camera is started one can click the Video-tab in the tab control to see one self.
- Enable Desktop Sharing button
- The fifth button, which looks like a blackboard, is for sharing a desktop application with other users in the same channel. A shared will be displayed in the Desktop-tab for other users.
- Mute All button
- The sixth button in the toolbar, with a speaker icon, is for muting all users in the channel you're participating in, so you can no longer hear them.
- Recording Conversation to Disk button
- The seventh button, which looks like a record button, is for storing text chat-logs and audio files to disk. See section Record Conversations to Disk on how to record conversations.
- Show Blinking Icon button
- The last button, which looks like a hand, is for enabling the Question status mode. This will make you appear as a user with a blink hand.
Channels View
The channels view is in the left side of the application above the volume controls. Once you have connected to a server you will see channels and users appearing here.
The channels will appear as folder icons and the computer icon in the top is also a channel, namely the root channel, where you will first appear when you connect to a server.
The user impersonating you will appear with bold text, so in the screenshot below Bjoern is me. The blue box surrounding the user-icon means that I'm currently transmitting video, so the other users in the channel can see Bjoern in the Video-tab.
The user Ida is also transmitting video but the blinking red line on her name means that the reception from her is very poor (video data is being lost). The user Randi has a green line over her name which means that she's currently transmitting audio, i.e. other users in the channel are hearing her talking. The blackboard behind Randi's user-icon means that she sharing a desktop application which can be seen in the Desktops-tab.
Channels and users
Notice that Bjoern in the above screenshot has a red star. This means the user is administrator of the server. The user Randi has a yellow star which means she is operator of the channel and can thereby kick people out of the channel and modify the channel's settings. People who are operators are usually the users who created the channel.
The channels view only shows users in channels. To be able to see all users on the server it's possible to use the Online Users Dialog.
Volume Controls
The volume controls are placed below the channels view. The first slider with a speaker to the left of it controls the master volume. Changing this increases or decreases the volume for all users. If you only want to change the volume of one person you can select this person and press Ctrl+Left arrow to lower volume and Ctrl+Right arrow to increase the volume. These two keyboard shortcuts are placed in the Advanced-menu.
The slider below the master volume with a microphone to the left controls your microphone's gain level, i.e. amplifying your volume so you become louder to other users.
To the right of master volume is progressbar with a wave to the left of it. This progressbar shows how much sound your microphone is picking up.
If voice activation is enabled the there will be a slider below the progressbar which sets the voice activation level. When using the voice activation slider to set the voice activation level ensure that it is not active all the time, since it can be annoying for other users. When voice activation becomes active the user in the channels view impersonating you will become green.
Chat Tab
The Chat-tab is used for text chatting with the people in your channel. A screenshot is shown there:
Chat-tab
The Chat-tab also maintains a list of events which occurred in your channel, like e.g. when a new user joins or leaves the channel. To send a text message to all users in your channel simply type in the line to the left of the Send-button. If the server supports channel commands it's also possible to send commands to the server using channel text messages.
Video Tab
The Video-tab contains a grid of all the users who are currently transmitting video to the channel. The users who are transmitting video will have a blue frame around their user icon in the channels view as can be seen in the following screenshot:
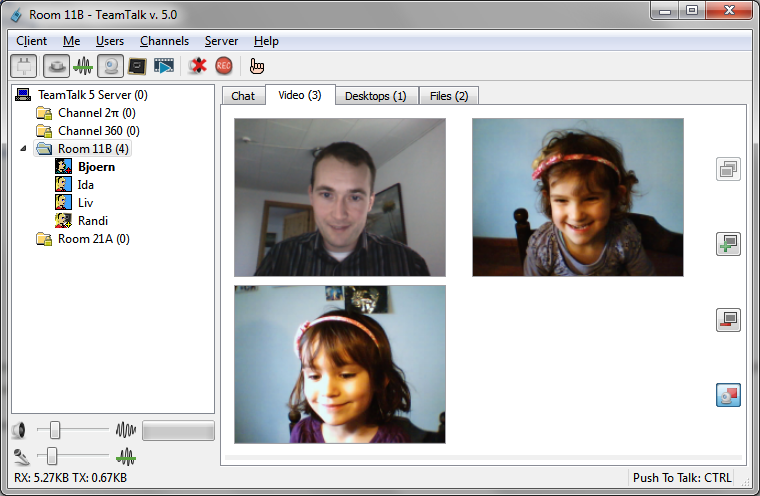
Video-tab
The button with the '-' sign in the Video-tab can be used to remove users from the grid so you will no longer receive video data from that user.
Pressing the button with the '+' sign will add the user to the grid again.
The button with the two frames, one above the other, is for detaching a user from the grid so the user will be shown in a separate window.
The last button the Video-tab is for starting and stopping your video camera. If you want other users to also see video sent from you press the video camera in the toolbar to the right of the voice activation icon.
Desktops Tab
The Desktops-tab contains a grid of shared desktop applications. Here is a screenshot of a shared desktop application:
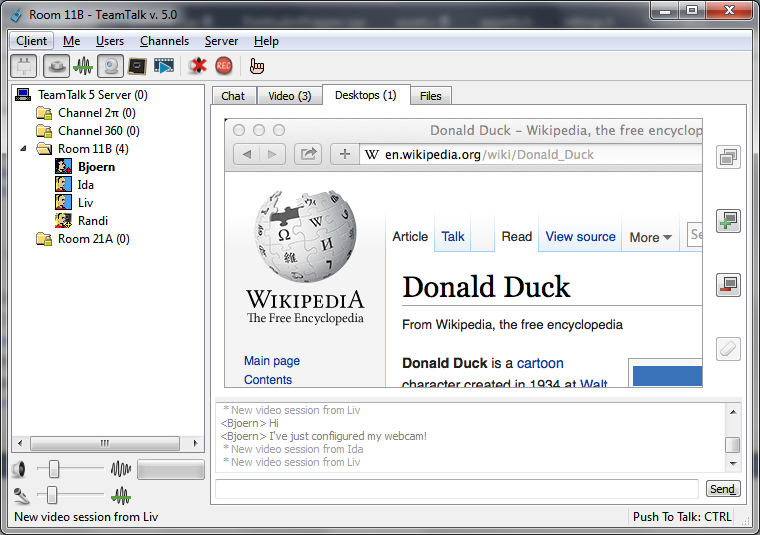
Desktop-tab
Moving your mouse over the desktop window will show who owns the desktop. Press and hold the mouse to scroll the window if it's bigger than the Desktops tab. Check out the Desktop Share section on how to share a desktop application.
Files Tab
If the server allows, users can upload and download files to and from a channel. When you join a channel you can see the files which are currently available in the Files-tab as shown in this screenshot:

Files-tab
Only users who have a user account on the server can upload files. Anyone can download files in a channel. Only the owner of a file, an administrator or an operator of a channel can delete a file. Instead of using the upload and download button in the Files-tab one can also drag/drop files from Windows' Explorer.
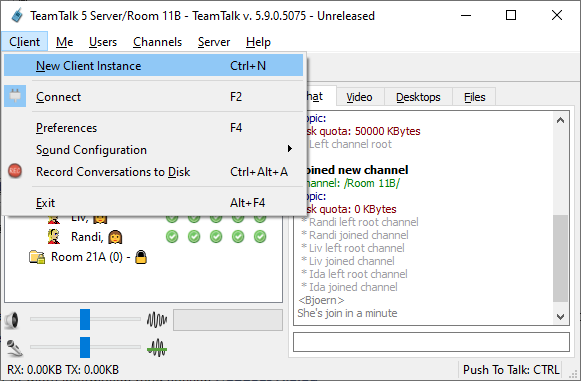
Client-Menu
The Client-menu is used for connecting to TeamTalk servers and configuring the TeamTalk application.
Client-menu
Each of the menu items in the Client menu are described here:
- New Client Instance
- Start a new TeamTalk instance, so you're able to connect to multiple servers. When starting a new instance you'll be asked to set up a profile. That way it's possible have use different configurations depending on which server you're connected to. There's a maximum of 16 profiles.
- Connect
- Preferences
- Preferences is used for configuring the TeamTalk application. For more information read section Preferences Dialog.
- Sound Configuration
- Record Conversations to Disk
- Exit
- Quit the TeamTalk application.
Connect to a Server Dialog
In the Connect to a Server dialog you can specify the TeamTalk server you want to connect to. It also maintains a list of publicly available TeamTalk servers you can connect to. An example of public TeamTalk servers are shown in the screenshot below.

Connect to a Server Dialog
If you manually want to connect to a TeamTalk server then the person who is running the server must provide the information for the fields Host IP-address, TCP port and UDP port along with a user account containing both username and password.
Each of the items in the dialog are explained here:
- Server List
- The available TeamTalk servers are listed here. Four types of servers will be listed here:
- Local servers
- Servers that have been stored manually.
- Official servers shown in blue
- Public servers hosted by BearWare.dk.
- Unofficial servers show in orange
- Public servers made available by TeamTalk users who host their own server.
- Filter Servers
- Name
- Use search pattern to find server with specific name.
- Users
- Exclude servers that do not have a minimum set of users.
- Include official servers (blue ones)
- Select to filter in/out official servers.
- Include unofficial servers (orange ones)
- Select to filter in/out unofficial servers.
- Server Information
- All the information needed to connect to a server must be specified here.
- Host IP-address
- The IP-address of the server to connect to. The list of previously used servers are available by going through the items using up/down arrow.
- TCP port
- The TCP port used by the server. Note that you can use telnet or nc to this TCP port and gets textual output. The TeamTalk protocol is human readable. Commands to login, logout, etc. are sent on this port.
- UDP port
- The UDP port used by the server. Audio, video, desktop sessions, etc. are transmitted on this port.
- Encrypted server
- If the TeamTalk server is a TeamTalk Pro Server then it can use encryption.
- Setup
- Encrypted TeamTalk Pro Servers can have additional protection for client and server verification. These additional properties can be configured in the Setup Encryption Dialog.
- Authentication
- Username
- The username that is required to log on to the server. This may be blank.
- BearWare.dk Web Login
- If the username to log on to a server is "bearware" then you must register a username on BearWare.dk and use this to log on to the server.
- Learn more about setting up user accounts by reading the section on configuring TeamTalk servers or the section about User Accounts.
- Password
- The password that is required to log on to the server. This may be blank.
- If username is a BearWare.dk Web Login then no password is required.
- Nickname
- By default the nickname in Preferences is used to log on to a server. However, a separate nickname can be used for a specific server.
- Join specific channel after authentication
- Channel
- The channel to join after login.
- Password
- The password required to join the channel.
Once you have filled out all the information you have been provided you can save the server to the Server List by filling the Entry name field and afterwards click Save to Server List.
- Store Server Information
- Entry name
- The name to be used when storing the server.
- Save to Server
- Store the fields in Server Information in the Server List on the left.
- Publish Publicly
- Publish the provided server information on BearWare.dk so others can see the server as an Unofficial server. I.e. your server will shown up publicly so others can join it from the server list.
- After publishing your TeamTalk server you must put the text #teamtalkpublish# into the server name using the Server Properties Dialog. This will verify that you're the owner of the server.
- To have your server removed again either delete the user account or put the text #teamtalkdelete# into the server name using the Server Properties Dialog. This will verify that you're the owner of the server.
- When you have a TeamTalk server published you'll see a user logging in at regular intervals in order to see how many users are connected. This user can be disabled by putting in the text #teamtalkskip# in the server name.
- Generate .tt File
- If you want others to connect to the same TeamTalk server as you, you can press Generate .tt File so you'll generate a file you can email to the users who should also connect to the server. More information about the Generate .tt File Dialog is available here.
- Import .tt File
- If you've received a .tt file from another TeamTalk user you can import the server to the Server List by pressing this button.
- Other users can send you .tt files that have been generated to contain the information you need to join their server.
Setup Encryption Dialog
TeamTalk Pro servers can enable encryption so all data sent and received cannot be decoded by anyone other than the client and server.
Using an encrypted connection is, however, not enough to ensure the server you're connecting to is authentic, i.e. someone else could intercept your initial connection and pretent to be running the server you're connecting to. This is known as a man-in-the-middle-attack. The way to avoid such abuse is to use certificates that verifies that the server you're connecting to is authentic.
To use certificates the owner of the TeamTalk Pro server must provide the client with a cerficate from a common/shared Certificate Authority (CA). This CA certificate can either be provided in a .tt file or in a *.cer file* (in PEM format).
To enable a CA certificate for a TeamTalk Pro server press the Open file button in the Certificate Authority (CA) row as shown below.
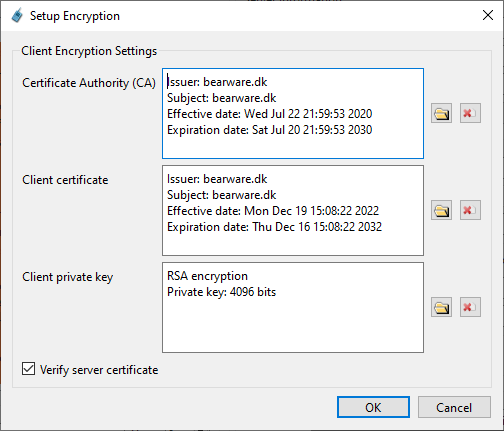
Setup Encryption
The CA certificate is valid if Issuer, Subject, Effective date and Expiration date are printed in the edit field.
Once a CA certificate has been set up the Verify server certificate checkbox is enabled and the client can now verify the connection will be establish only if the server is authentic.
Some TeamTalk Pro server owners may also want to verify that the clients who connect are also authentic. This is done by using Client certificate that has been issued by the TeamTalk Pro server owner along with a Client private key. The client certificate and private key can be provided in either a .tt file or in two .pem files (in PEM format).
Press the Open file button in Client certificate row and add the .pem file to enable a client certificate. If the client certificate is valid then Issuer, Subject, Effective date and Expiration date are printed in the edit field.
A Client private key file is required for a client certificate and this is added by pressing the Open file button in the Client private key row. If the private key is valid then the encryption algorithm is printed along with the key size.
Press OK to activate the encryption settings in remember to press Save to Server List in the Connect to a Server Dialog.
Preferences Dialog
The Preferences dialog is used for configuring the TeamTalk application. Users should at least run through the General and Sound System-tabs to ensure everything is configured properly.
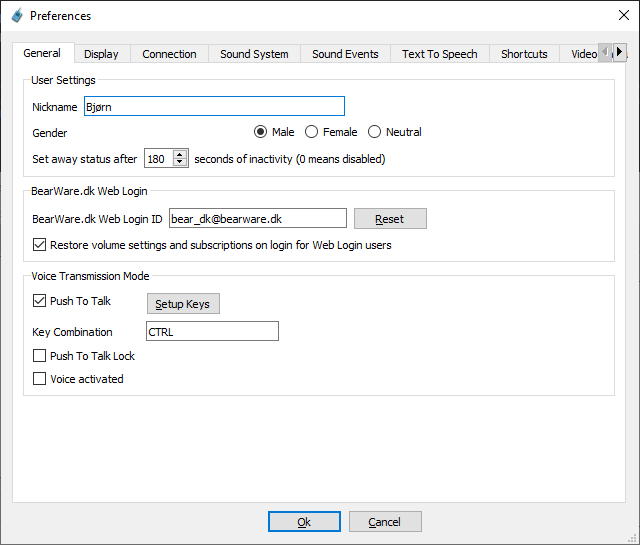
Preferences dialog
Please read section TeamTalk Preferences for a guide on how to configure TeamTalk.
Sound Configuration-Menu
The Sound Configuration submenu is used for quick access to settings that are otherwise in Preferences Dialog's Sound System-tab.
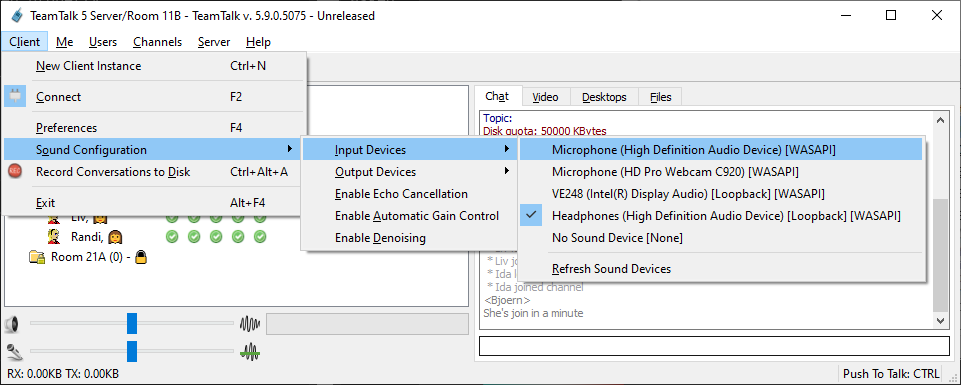
Sound Configuration's Inputs submenu
Echo cancellation, automatic gain control and denoising can be enabled using shortcut keys. The currently active sound input devices and sound output devices can also be selected in Input Devices and Output Devices submenu.
Sound input devices with the [Loopback]] postfix sends audio played on the select input device back into TeamTalk as its microphone input.
Record Conversations to Disk
Conversations with others users, both audio and text messages, can be stored to disk using the Record Conversations to Disk dialog in Client-menu or by pressing the recorder button in the toolbar.
The record conversations dialog looks as follows:
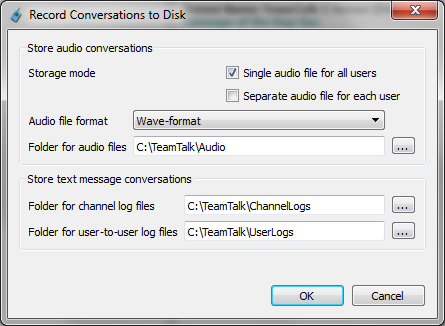
Record Conversations to Disk
Each of the items in the dialog are explained here:
- Storage mode
- Single audio file for all users
- Audio from all users in your channel is merged into a single file.
- Separate audio file for each user
- Each user in your channel will have a separate audio file every time the person starts talking.
- Audio file format
- The file format to use for storing audio files. Choosing ogg-format will store in the audio codec format selected by the channel. The VLC media player can play ogg-format.
- Folder for audio files
- The file name for the audio files is generated automatically but the folder for storing the files has to be specified in this field.
- Folder for channel log files
- When joining a channel a new log file will be created in this folder containing the date and channel name.
- Folder for user-to-user log files
- When receiving a text message from another user a new log file will be created in this folder with the nickname of the user.
Me-Menu
The menu items in the menu group Me are options you want to perform on yourself. The possible options are shown here.
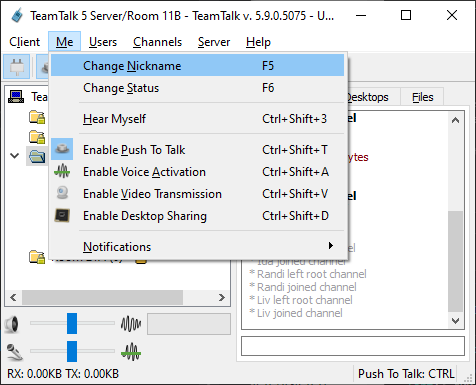
Me-menu
Each of the menu items in the Me-menu are described here:
- Change Nickname
- This will change your name on the server. Your current nickname is the one shown in bold text in the channels view. The nickname is simply a display name. It has no relation to your username (if you have a user account). In User Accounts Dialog it's possible to lock the nickname so it cannot be changed. This is especially useful if you use BearWare.dk Web Login and want people to use their registered name.
- Change Status
- This is used to change your status mode, like e.g. Available, Away, Question-mode and set a message regarding your current status.
- Hear myself
- When in a channel this option can be used to hear your self to e.g. determine your voice level. This is actually the same as subscribing to your own voice stream in [Subscription-menu](Subscriptions-Menu).
- Enable Push To Talk
- Push To Talk is a key combination you need to hold down whenever you are talking. Using a Push To Talk key combination is especially usefull if you are using speakers and have problems with echos. To transmit voice data from microphone requires the User Right User can transmit voice data.
- Enable Voice Activation
- Instead of using Push To Talk one can have TeamTalk detect when you are talking and then start transmitting. To transmit voice data from microphone requires the User Right User can transmit voice data.
- Enable Video Transmission
- Enable this item to start transmitting video to other users in your channel. Note that you need to configure your web camera before doing this. To transmit video data from webcam requires the User Right User can transmit video data.
- Enable Desktop Sharing
- Notifications
Enable Push To Talk Dialog
Using Push To Talk is a good way to ensure people do not overlap each other when they are talking and to avoid echos from speakers. To set up a hotkey simply hold down the keys you want to use as your key combination and release them all again. The Push To Talk dialog will show the keys you're holding down like here.
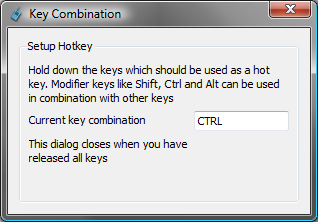
Push To Talk
Using Ctrl is a good choice for a Push To Talk key. Note that using regular keys can make Windows beep unlike when using non-modifier keys like Ctrl, Alt, Shift. Therefore Ctrl or Alt or Shift is recommended.
Enable Desktop Sharing Dialog
The window of an application on your desktop can be shared with other users in the same channel. This can be used for doing a presentation in an eLearning scenario.
The Desktop Sharing dialog is shown here:

Desktop Sharing
To be able to share a desktop window requires the User Right User can transmit desktop sessions.
Each of the items in the dialog are explained here:
- Share entire desktop
- Instead of sharing only one application you can share your entire desktop. Note that this may require a lot of bandwidth usage.
- Share active window
- Share the window on your desktop which currently have keyboard and mouse focus. This option is useful if you intend to show several application windows during your presentation.
- Share specific window
- Only share a single application window and it has to be the one with the title specified in the selection box.
- Color mode
- The more colors you use for showing your application the better it looks, but it also requires mode bandwidth.
- Update interval
- Enable this option if the window you're sharing changes during your presentation. TeamTalk will then update the window on a timely basis.
- Share desktop cursor
- Enable this option if remote users should be able to see where your mouse cursor is point to.
Users-Menu
The menu items in the Users-menu are used for changing the settings of other users and interacting with them. The Users-menu is shown here:
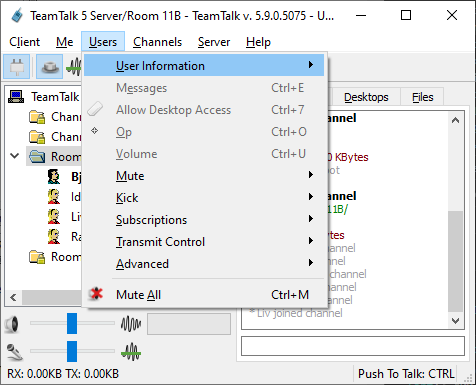
Users menu
Each of the menu items in the Users menu are described here. A user has to be selected in the channels view for the Users menu items to be active.
- User Information
- View User Information
- Use this menu item to get extended information about a user, like e.g. username, user type and packet reception.
- Speak User Information
- Use Text-To-Speech to speak user information.
- Messages
- The menu item is for sending user to user text messages. A message dialog will pop up on the user's computer when you send him a message. This option can however be disabled in the Display tab in Preferences. In the message dialog, you can switch between the history and the message text box with the F6 key.
- Allow Desktop Access
- If you're sharing a desktop window using desktop sharing then you can allow the users you select in the channel view to control mouse and keyboard on your computer by enabling this menu item. Note that Allow Desktop Access is actually the same as enabling the Desktop Access-subscription in Subscription-menu.
- Op
- Op is short for channel-operator. Read section Channel Operators to learn more about channel operators.
- Volume
- If a user is either too loud or too quiet one can use the volume dialog to turn the volume up and down. Most users would probably prefer to use the volume controls in the Advanced-menu.
- Mute
- Mute Voice
- Mute the user's voice stream so you will not hear audio from this person. Note that you will still receive audio data from the user. To also disable the voice stream completely look in the Subscriptions-menu.
- Mute Media File
- Mute the user's audio media file stream so you will not hear audio from this person. Note that you will still receive audio data from the user. To also disable the media file stream completely look in the Subscriptions-menu.
- Kick
- Kick from channel
- Kick the user out of the channel.
- Kick and Ban From Channel
- Ensure the user cannot join the channel again by banning either the person's username or IP-address.
- Kick from server
- Kick the user off the server so the person has to log in again.
- Kick and Ban From Server
- Subscriptions
- Transmit Control
- Advanced
- Mute All
- Mute the sound from all users, both voice streams and media file streams.
Channel Operators
A channel operator is typically a channel owner, i.e. the user who initially created the channel. As channel operator one can kick people out of the channel, make changes to the channel's properties and control who can transmit in the channel.
Being channel operator is similar to having the User Right User can create/modify all channels but instead of "all channels" the user can only make changes to the channels which the user is operator of.
When creating a channel one can also set an Operator password so others can become channel-operators by entering this password.
In the User Accounts Dialog it's possible to set up users to automatically become channel operators.
As channel operator use the Transmit Control to toggle who can transmit to the channel.
Subscriptions-Menu
Subscriptions are used for ignoring certain data or events from a user. If e.g. you do not want to receive text messages from a certain user you can tell the server that you want to unsubscribe text messages from that user.

Subscriptions menu
Each of the menu items in the Subscriptions-menu are described here.
- User Messages
- If checked you accept text messages from this user.
- Channel Messages
- If checked you accept channel text messages from this user.
- Broadcast Messages
- If checked you accept broadcast messages from this user. Only administrators can by default broadcast text messages.
- Voice
- If checked you accept microphone audio from this user. Unlike Mute in Users-menu disabling this will also stop the user from sending audio data to you.
- Video
- If checked you accept video from this user. Unsubscribing video is the same as pressing the minus button in the Video-tab.
- Desktop
- If checked you accept shared desktop windows from this user. Unsubscribing Desktop is the same as pressing the minus button in the Desktops-tab.
- Desktop Access
- If checked and you're sharing a desktop then you allow the selected user to take control of your mouse and keyboard.
- Media File
- Intercept User Messages
- Receive all the user's text messages, both to usee and to all other users the user is sending to. In other words this is like spying on the user. Only administrators can do this.
- Intercept Channel Messages
- Receive all the user's channel text messages, even if you're not in the user's channel. Only administrators can do this.
- Intercept Voice
- Receive audio from this user, even if you're not in the same channel. Only administrators can do this.
- Intercept Video
- Receive video from this user, even if you're not in the same channel. Only administrators can do this.
- Intercept Desktop
- Receive shared desktop windows from this user, even if you're not in the same channel. Only administrators can do this.
If there's certain subscriptions you always want to have disabled by default you can set these in the Connection-tab of the Preferences dialog.
Transmit Control-Menu
This submenu is used by channel operators to control who is allowed to transmit voice, media streams, desktops and send text messages to the channel.
- Allow Channel Text Messages
- Toggle whether the user can send text messages to the channel.
- Allow Voice Transmission
- Toggle whether the user can transmit voice to the channel.
- Allow Video Transmission
- Toggle whether the user can transmit video from webcam to the channel.
- Allow Desktop Transmission
- Toggle whether the user can share desktop windows to the channel.
- Allow Media File Transmission
- Toggle whether the user can transmit media files to the channel.
- Allow All Channel Text Messages
- Toggle whether all users can send text messages to the channel. This option is typically used for [classroom](Classroom Channel Type) channels.
- Allow All Voice Transmission
- Toggle whether all users can transmit voice to the channel. This option is typically used for classroom channels.
- Allow All Video Transmission
- Toggle whether all users can transmit video from webcam to the channel. This option is typically used for [classroom](Classroom Channel Type) channels.
- Allow All Desktop Transmission
- Toggle whether all users can share desktop windows to the channel. This option is typically used for [classroom](Classroom Channel Type) channels.
- Allow All Media File Transmission
- Toggle whether all users can transmit media files to the channel. This option is typically used for [classroom](Classroom Channel Type) channels.
Advanced-Menu
This main purpose of the Advanced-menu is to provide keyboard shortcuts to common tasks.

Advanced menu
Each of the menu items in the Advanced-menu are described here.
- Increase Voice Volume
- This is basically a shortcut to Volume in Users-menu.
- Lower Voice Volume
- This is basically a shortcut to Volume in Users-menu.
- Increase Media File Volume
- This is basically a shortcut to Volume in Users-menu.
- Lower Media File Volume
- This is basically a shortcut to Volume in Users-menu.
- Store User(s) for Move
- Store the selected users (like clipboard) so they can be moved to another channel.
- Move User(s)
- Move the selected users, i.e. those from Store User(s) for Move, to the selected channel.
- Relay Voice Stream
- Replace own microphone input (voice stream) with this user's voice stream. If user is not in the same channel then ensure to toggle "Intercept Voice" in Subscriptions menu.
- Voice activation and push to talk cannot be active when audio relay is activated.
- Relay Media File Stream
- Replace own microphone input (voice stream) with this user's media file stream. If user is not in the same channel then ensure to toggle "Intercept Media File" in Subscriptions menu.
- Voice activation and push to talk cannot be active when audio relay is activated.
Channels-Menu
The menu items in the Channels menu become available when you select a channel in the channels view. All the channel options are shown here:

Channels menu
Each of the menu items in the Channels menu are described here.
- Join Channel Leave Channel
- Join the currently selected channel. An alternative way to join a channel is to use the Create Channel Dialog and type the name and the password of the channel to join while being in its parent channel. All properties specified in the Create Channel Dialog will be ignored if the channel already exists.
- Channel Information
- View Channel Info
- View channel information about the selected channel. Details about a channel are described in Create Channel Dialog.
- Speak Channel Info
- Use Text-To-Speech to speak information about channel
- Speak Channel State
- Use Text-To-Speech to speak about who is currently transmitting in the channel.
- Create Channel
- Update Channel
- Delete Channel
- Delete the selected channel and any sub-channels. If there's users in the channel then they will be kicked out. Only users with User Right User can create/modify all channels can delete a channel.
- Banned Users From Channel
- List the users who are currently banned from joining the selected channel. Only users who are channel operators or have a user account with the ability to ban people are able to remove banned users.
- Stream Media File to Channel
- Upload File
- Upload a file to a channel. To upload a file a user must have a user account on the server and the User Right User can upload files. An Administrator can upload a file to any channel whereas Default user can only upload to their current channel. Read section Files-tab for more information on handling files. Note that the channel must have a disk quota to upload a file. The disk quota is explained in section Create Channel Dialog.
- Download File
- Delete File
- Delete the file selected in Files-tab. Only the owner of a file can delete it, the channel-operator or a user of user-type Administrator.
Create Channel Dialog
To chat with other users in TeamTalk one has to either create a channel or join an existing channel. A new channel can be created by pressing F7 and the following dialog will show up:

Create Channel
Each of the fields in the create channel dialog are described here:
- Channel Path
- Each channel can have subchannels which again can have subchannels. In TeamTalk channels are separated with / and the full path of your new channel will be displayed here.
- Channel name
- The name of your new channel. Ensure that / is not in the name.
- Topic
- Each channel can have a topic which both users who are in the channel and who are not in the channel can read.
- Password
- The password required to join the channel (optional).
- Operator password
- The first person to create a new channel will automatically become operator of that channel. This means the user can kick people out of the channel and update its settings later on. If the person leaves the channel at some point and comes back that person can click the Op item in the Users-menu to become operator again.
- Max users
- The maximum number of users allowed in the channel.
- Disk quota (KBytes)
- Permanent channel (stored on server)
- No interruptions (no simultaneous voice transmission)
- If this option is enabled only one person can talk in the channel. In other words where will be no overlapping conversations. To talk in this type of channel you must wait until the channel becomes "silent". In Sound Events in Preferences there's an option to play a sound when a channel is "free for chat".
- Classroom (operator-controlled transmission)
- If this option is enabled the channel operator can control who is allowed to talk, send video and share desktops in the channel. See section classroom for more information.
- Operator receive only (only operator see and hear users)
- This channel type can be used for reducing network traffic when e.g. TeamTalk is used for teaching. Only user's with User Right User can create/modify all channels and operators of a channel will see and hear users in the channel.
- No voice activation (only Push-To-Talk allowed)
- No audio recording allowed (save to disk not allowed)
- Hidden channel
- Create a hidden channel that can only be seen by users with User Right User can see hidden channels. Creating a hidden channel requires User Right User can create/modify all channels. To join a hidden channel that cannot be seen use the Create Channel Dialog and type the name of the channel, its password and press OK. Ensure to be in the parent channel of the hidden channel while doing this.
- A hidden channel must be a sub channel with no other sub channels, i.e. a leaf node.
- Note that it is not possible to update an existing channel to a hidden channel, and vice versa.
- Audio Codec
- Codec Type
- In TeamTalk each channel must specify which audio codec all users in the channel must use to join the channel. TeamTalk currently supports Speex and OPUS.
- OPUS codec
- Application
- Use VoIP if channel is primarily used for users talking together. Use Music if channel is primarily used for streaming high quality audio, like e.g. music.
- Sample Rate
- The sample rate to use. The higher the better audio quality.
- Audio Channels
- Mono or Stereo. OPUS automatically switches to mono if bitrate is less than 30 kbit.
- Bitrate
- The bitrate to use. OPUS supports 6-510 KBit/sec.
- Variable Bitrate
- Enable to reduce bandwidth usage.
- Ignore silence (DTX)
- Discontinuous transmission (DTX), i.e. if the OPUS codec detects there's silence then it will output empty packets to conserve bandwidth.
- Transmit interval
- The number of milliseconds of recorded audio before the TeamTalk client should transmit. If transmit interval is higher than 120 msec then a Frame size must be specified.
- Frame size
- A higher frame size gives less bandwidth usage but more latency. If transmit interval is higher than 120 msec then a frame size must be specified.
- Speex codec
- Sample rate
- The sample rate to use. The higher the better audio quality.
- Quality
- Increasing the quality will require more bandwidth but the sound quality will get better. Ensure to use a setting which is not higher than everyone you want to talk to have an Internet connection which supports the required bandwidth.
- Transmit interval
- The number of milliseconds of recorded audio before the TeamTalk client should transmit.
- Speex Variable Bitrate
- Sample rate
- The sample rate to use. The higher the better audio quality.
- Quality
- Increasing the quality will require more bandwidth but the sound quality will get better. Ensure to use a setting which is not higher than everyone you want to talk to have an Internet connection which supports the required bandwidth.
- Max bitrate
- The encoder should stay below this bitrate.
- Ignore silence (DTX)
- Discontinuous transmission (DTX), i.e. if the OPUS codec detects there's silence then it will output empty packets to conserve bandwidth.
- Transmit interval
- The number of milliseconds of recorded audio before the TeamTalk client should transmit.
- Enable fixed audio volume for all users
- In most cases users have microphones with different audio volume levels which makes some users louder than others. Enabling this option ensures that all users in the channel speaks at the same audio volume level. Note that this option may reduce audio quality.
- Volume level
- The reference volume all users in the channel should use.
Classroom Channel Type
If there's many people in a channel it's often nescessary for someone to control who is talking. The classroom channel type can be used for controlling which users are allowed to transmit audio, video and media files to a channel.
If a channel is configured as a classroom then the channels view will look something like this:

Classroom channel
The checkboxes in front of each user are used to control who can transmit to the channel. In the above screenshot Ida and Liv are e.g. allowed to transmit video from webcams. The user Randi is allowed to transmit shared desktop but cannot transmit video since she is not checked.
As can be seen on the screenshot there's also checkboxes to the right of the channel name Room 11B. These checkboxes can be used as a shortcut for allowing everyone to transmit. So voice and media files can be transmitted by anyone in the channel.
As an alternative to the checkboxes it's also possible to use the Transmit Control menu to toggle who can transmit.
For a non-operator of the classroom channel the view of the Room 11B channel will look like this:
Classroom channel without control
A non-operator cannot modify any of the transmission settings. They will have to ask the channel-operator to toggle the checkboxes for transmission.
Stream Media File to Channel Dialog
In the Channels-menu there's an option to stream media files to others users in the same channel. For fast access the play icon in the toolbar can also be used.
Here's an example of streaming a media file with video content to a channel:

Stream media file
The users receiving the media stream can use the volume dialog in Users-menu to control the volume level of the media file. If it's media file containing video content then the video can be seen in the video-tab.
Server-Menu
The Server-menu is mainly intended for server administrators to administrate users who have access to the server. The Server-menu contains the items shown here:

Server Menu
Each of the menu items in the Server-menu are described here.
- User Accounts
- See the properties of the user account which is currently active (your on login). If you're logged in as administrator you can list all user accounts on the server and administrate existing ones. More is explained in the [User Accounts Dialog](User Accounts Dialog).
- Banned Users
- List all the users who are banned from the server. Users are banned based on their IP-address. Since user's IP-addresses often change from day to day it might be that a user who was previously banned can log on to the server again a day or two later. Only users with User Right User can ban users from server can list the banned users on a server. More is explained in section Banned Users Dialog.
- Online Users
- List all users who are currently connected to the server, also those who are not in a channel.
- Broadcast Message
- Broadcast a message to all users on the server. The message will appear in the Chat-window. Only users with User Right User can broadcast text messages can broadcast text messages.
- Server Properties
- Save Configuration
- Save the server's current state, i.e. save the current server properties and all permanent channels. If Auto save server changes is checked in Server Properties all new permanent channels are saved automatically. Also channels which are deleted are removed from the server's configuration.
- Server Statistics
- Get incoming and outgoing bandwidth usage.
User Accounts Dialog
For users to log on to a TeamTalk server they must have a user account. Only users of user-type Administrator can create/modify user accounts. When the TeamTalk server is configured initially an administrator account can be set up so further user accounts can be created using this user accounts dialog.
Here is shown the User Accounts-dialog.

User Accounts
The Active Users list contains all the user accounts on the server.
The remaining items are explained in the following sections.
Modify User Account
- Close
- Clear
- Clear the fields for the user account.
- Delete
- Delete the seleced user account in the Active Users list.
- Add/Update
- Create or update a user account.
Basic Account Properties
- User type
- Currently TeamTalk supports two types of users, Default User and Administrator. Administrator have full rights to everything whereas default users only have limited rights.
- Username
- The username for the user account. A client logging on to the TeamTalk server must provide this along with a password.
- To enable BearWare.dk Web Login on a TeamTalk 5 Pro Server then create a user account with the username "bearware". Don't specify a password.
- To create a user account for a specific BearWare.dk Web Login user on a TeamTalk 5 Pro Server then create a user account with the login name followed by @bearware.dk, e.g. bear_.nosp@m.dk@b.nosp@m.earwa.nosp@m.re.d.nosp@m.k. Don't specify a password.
- Password
- The password of the new user account.
- Don't specify a password for BearWare.dk Web Login accounts.
- Note
- Information about the user account can be put here.
- Initial Channel
- Once the user with this account logs on to the server the person should be moved to the specified channel. Note this requires that the user is running TeamTalk 4.3 or later.
User Rights
- User can log in multiple times
- If enabled multi users can log in with the same username. If disabled and two log in with the same username, then the first person to log in will be kicked off the server.
- User can change nickname
- If unchecked then the user cannot change the client's nickname using the Change Nickname menu item. This can also be used if users should be forced to use their registered profile name as nickname when using BearWare.dk Web Login.
- User can see users in all channels
- If unchecked the user can only see users in the current channel.
- User can see hidden channels
- Hidden channels will be visible to the user. See Hidden channel on how to create hidden channels.
- User can create/modify all channels
- User can create/update/delete all channels on the server. User can also create permanent channels. If unchecked user can only join existing channels.
- User can create temporary channels
- If checked user can create a channel on the server but the channel will disapper when the last user leaves the channel.
- User can broadcast text messages
- The Broadcast Message menu item in Server-menu is enabled for the user.
- User can kick users off the server
- The Kick menu items in Users are enabled for the user.
- User can ban users from server
- The Kick and Ban menu item in Users is enabled for the user.
- User can move users between channels
- The user can move users between channels using drag/drop.
- User can make other users channel operator
- The user can make other users channel-operator instead of having users specify an operator-password.
- User can upload files
- The Upload file menu item in Channels will be enabled.
- User can download files
- The Download file menu item in Channels will be enabled.
- User can update server properties
- User can transmit voice data
- User can transmit video data
- The user can transmit video data from webcam to channels.
- User can transmit audio files
- User can transmit video files
- User can transmit desktop sessions
- User can get remote access to desktop sessions
- If checked and another user is sharing a desktop window then it will possible for the user to control mouse and keyboard on the shared desktop window.
Channel Operator
- Auto-Operator Channels
- Selected Channels
- The user with the specified user account will automatically become channel-operator in the listed channels.
- Available Channels
- The list of channels where a user can automatically become channel-operator. Only static channels are supported for auto-operator mode.
Codec Limitations
- Max bitrate for audio codecs
- If users are allowed to create channels on a server setting this option can limit the bitrate of the audio codec they are able to specify.
Abuse Prevention
- Limit issued commands
- Prevent users from sending numerous commands to the server or other users.
Banned Users Dialog
The Banned Users dialog shows the users who are currently blocked by the server. Here is an example of users which have been banned on a server.
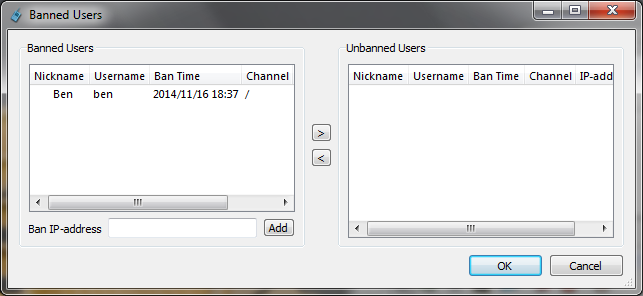
Banned Users
To remove a ban on a user simply move the user from the left list to the right list using the button with the greater than sign.
New bans based on username or IP-address can be added manually using the Add-button. Wildcards can be used for IP-address, e.g. 192.168.0.*.
Online Users Dialog
The channels view only shows the users in channels but to see all users on the server you can use the Online Users dialog.
Open the Online Users dialog by pressing Server-menu and then Online Users.
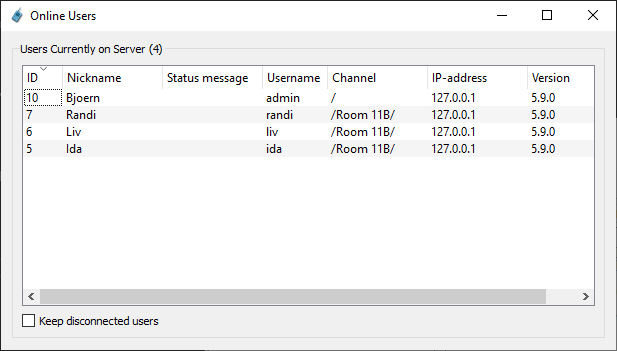
Online Users
The dialog also has quick menu options for kicking and banning users, as well as text messaging users.
- Keep disconnected users
- Users who disconnect will still be shown in the users list but with user-ID 0.
Server Properties Dialog
The Server Properties-dialog shows what rights users who are logged on to the server has. An example is shown here where user has User Right User can update server properties:

Server Properties
Each of the fields in the Server Properties-dialog are described here:
- Server name
- The name which will appear on the root channel in the channels view.
- Max users
- The maximum number of users on the server. The maximum supported by TeamTalk is 1000.
- Message of the day
- The message of the day which users will see in the Chat-tab when they log on to the server.
- Show variables
- If variables are used in the Message of the day enable this option to view them.
- TCP port
- The server's TCP port for commands. If changed the new port will not be used until next time the server is restarted.
- UDP port
- The server's UDP port for audio and video data. If changed the new port will not be used until next time the server is restarted.
- User timeout
- The number of seconds a user can stay on the server without having sent so-called keep-alive information to the server. If the User Timeout value is exceeded the server will drop (kick) the user.
- Auto save server changes
- If checked the server will automatically save changes to Server Properties and store when new static channels are created, updated or removed.
- Voice TX max
- Setting this option can limit how much voice data the server is allowed to forward every second. If this value is exceeded later voice packets are simply dropped.
- Video TX max
- Setting this option can limit how much video data (from webcams) the server is allowed to forward every second. If this value is exceeded later video packets are simply dropped.
- Media File TX max
- Setting this option can limit how much media file data (both audio and video) the server is allowed to forward every second. If this value is exceeded later media file packets are simply dropped.
- Desktop TX max
- Setting this option can limit how much desktop data is allowed to be forwarded through the server. Unlike audio and video packets, desktop packets are retransmitted.
- Total TX max
- The overall maximum throughput the server is allowed to use for forwarding packets.
- Max login attempts before ban
- If a user has tried to login with an incorrect password this number of times then ban the user's IP-address.
- Max logins per IP-address
- The maximum number of simultaneous logins from a single IP-address.
- Login delay per IP-address
- Duration before the same IP-address can try to log on again.
- Server Logging
- The list of events that the server is logging to disk.
- Server version
- The version of the server which the user is connected to.
Help-Menu
The menu items under Help are used for getting information about the TeamTalk application.

Help menu
Each of the menu items in the Help menu are described here:
- Manual
- BearWare.dk Website
- About
- Opens a dialog with version information about the installed TeamTalk client.
